tow TESLA MODEL X 2018 Owner's Manual
[x] Cancel search | Manufacturer: TESLA, Model Year: 2018, Model line: MODEL X, Model: TESLA MODEL X 2018Pages: 213, PDF Size: 5.37 MB
Page 2 of 213

Overview............................................................. 2
Interior Overview.........................................................................2
Exterior Overview....................................................................... 3
Opening and Closing..................................... 4 Doors............................................................................................... 4Windows....................................................................................... 12Rear Trunk.................................................................................... 13 Front Trunk...................................................................................15Glove Box......................................................................................17Cup Holders................................................................................. 18Sun Visors.....................................................................................19
Seating and Safety Restraints................. 20 Front and Rear Seats.............................................................. 20Seat Belts..................................................................................... 27Child Safety Seats.................................................................... 30
Airbags.........................................................................................40
Driving...............................................................45 Driver
Profiles............................................................................ 45
Steering Wheel.......................................................................... 47
Mirrors.......................................................................................... 50 Starting and Powering
Off..................................................... 51
Gears............................................................................................. 53 Instrument Panel.......................................................................54Lights............................................................................................ 60Wipers and Washers............................................................... 65Brakes........................................................................................... 66 Traction Control........................................................................ 69Park Assist.................................................................................. 70Vehicle Hold................................................................................ 72Acceleration Modes................................................................. 73 Trip Information.........................................................................75
Getting Maximum Range....................................................... 76Rear View Camera.................................................................... 78 Active Spoiler............................................................................. 79Towing and Accessories........................................................ 80
Driver Assistance.......................................... 88
About Driver Assistance........................................................ 88
Traffic-Aware Cruise Control................................................ 91
Autosteer..................................................................................... 97 Auto Lane Change................................................................. 100 Autopark.................................................................................... 102Lane Assist................................................................................ 106Collision Avoidance Assist.................................................. 108 Speed Assist...............................................................................112
Using the Touchscreen............................... 114Touchscreen Overview...........................................................114 Controls....................................................................................... 119Settings....................................................................................... 122 Climate Controls...................................................................... 126Smart Air Suspension............................................................ 132Media and Audio..................................................................... 134 Phone...........................................................................................139Maps and Navigation.............................................................. 141 Calendar..................................................................................... 146Security Settings..................................................................... 147 HomeLink
Page 7 of 213

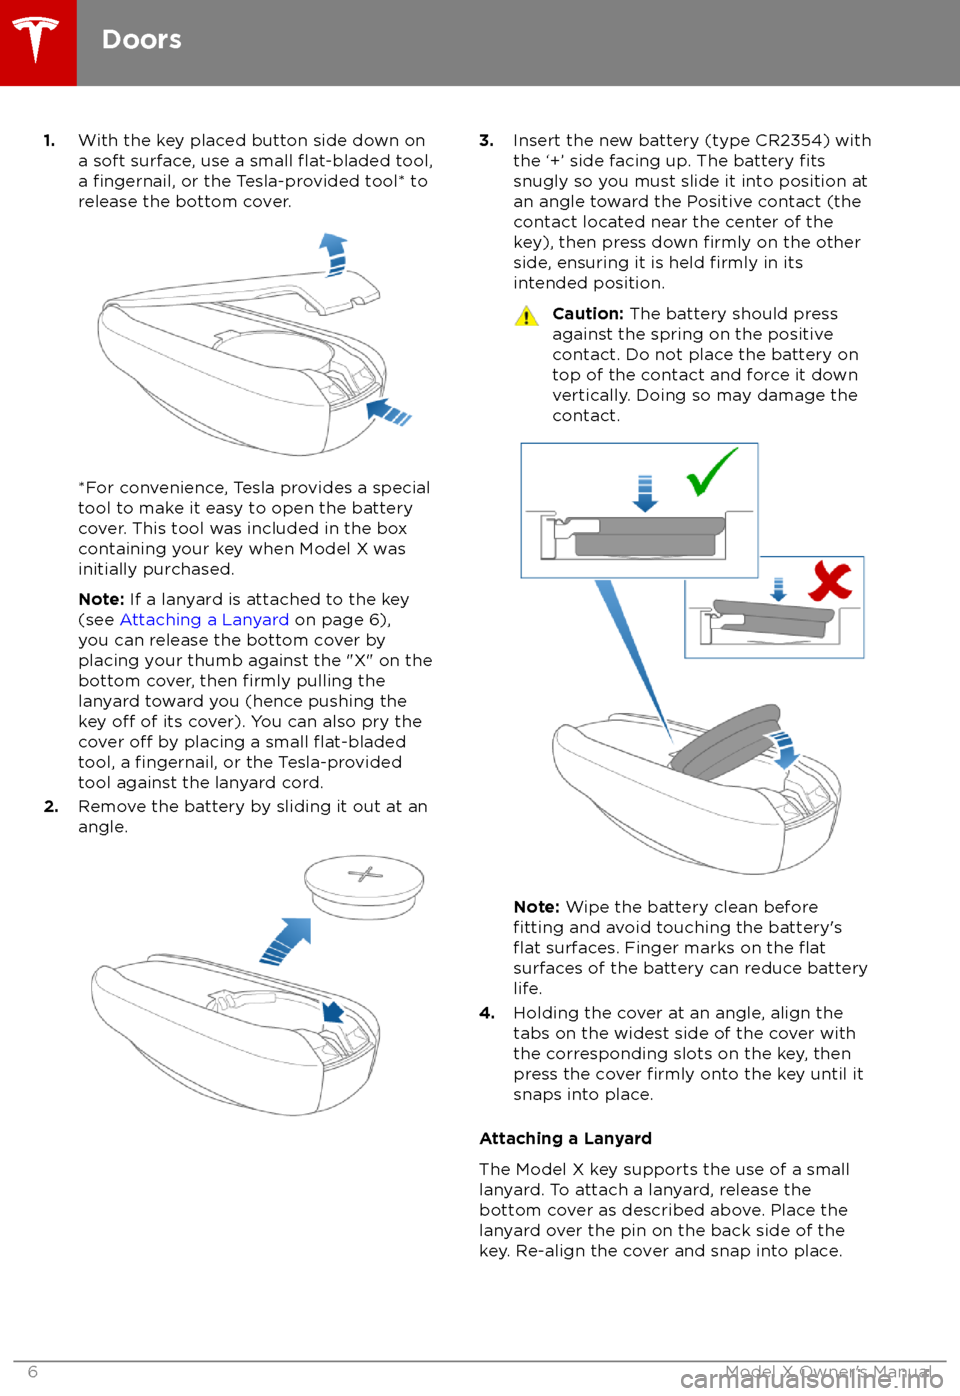
1.With the key placed button side down on
a soft surface, use a small flat-bladed tool,
a fingernail, or the Tesla-provided tool* to
release the bottom cover.
*For convenience, Tesla provides a special
tool to make it easy to open the battery cover. This tool was included in the box
containing your key when Model X was
initially purchased.
Note: If a lanyard is attached to the key
(see Attaching a Lanyard on page 6),
you can release the bottom cover by
placing your thumb against the "X" on the bottom cover, then
firmly pulling the
lanyard toward you (hence pushing the
key
off of its cover). You can also pry the
cover off by placing a small flat-bladedtool, a fingernail, or the Tesla-provided
tool against the lanyard cord.
2. Remove the battery by sliding it out at an
angle.
3. Insert the new battery (type CR2354) with
the
Page 8 of 213

Getting More KeysIf you lose a key or require an additional one,
contact Tesla. Model X can recognize up to
eight keys.
When ordering a new key for Model X, take all
available keys with you for reprogramming.
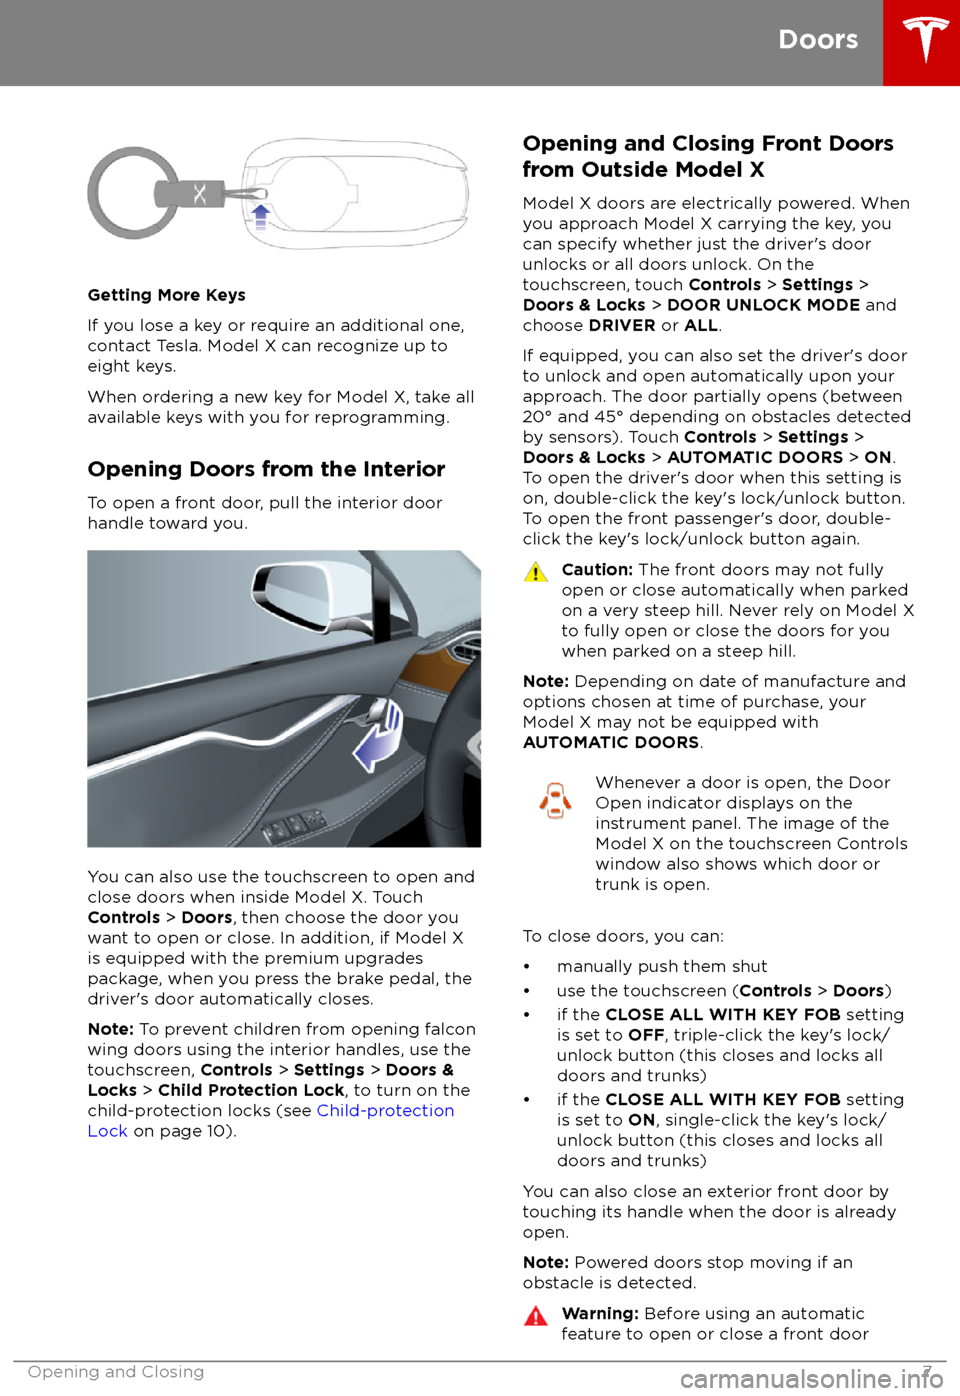
Opening Doors from the Interior
To open a front door, pull the interior door
handle toward you.
You can also use the touchscreen to open and
close doors when inside Model X. TouchControls > Doors , then choose the door you
want to open or close. In addition, if Model X
is equipped with the premium upgrades
package, when you press the brake pedal, the
driver
Page 15 of 213

Adjusting the Opening Height
You can adjust the opening height of the
powered liftgate to make it easier to reach:
1. Open the liftgate, then manually lower or
raise it to the desired opening height.
2. Press and hold the button on the
underside of the liftgate for two seconds
until you hear a
confirmation chime.
3.Confirm that you have set it to the desired
height by closing the liftgate, then
reopening it.
Accessing the Cargo Area To access the cargo area inside the Model X
rear trunk, push down on the ridged portion of the handle of the cargo cover and then pull
up. You can then adjust the position of the
cargo cover or completely remove it from
Model X.
Caution: Never load more than 175 lbs
(80 kg) on the rear load floor (above the
lower trunk compartment) or more than
130 lbs (60 kg) in the lower trunk
compartment. Doing so can cause
damage.Interior Emergency Trunk Release
An illuminated mechanical release located
inside the rear trunk allows you to open the
rear trunk from the inside if Model X has no
electrical power. This mechanical release also
allows a person locked inside to get out.
1. Remove the cover by pulling its lower
edge very firmly toward you.
2. Pull the cable to release the latch.
3. Push the rear trunk open.
Note: The button glows for several hours after
a brief exposure to ambient light.
Warning: Do not allow children to play
inside the trunk or become locked inside.
An unrestrained child could
suffer serious
injury or death in a crash. A child could
suffer heat exhaustion if trapped in the
vehicle, especially without climate control
on.
Rear Trunk
14Model X Owner
Page 20 of 213

The sun visors in Model X are held in place by
magnets. To protect occupants from sunlight
coming through the windshield, release the sun visor from the pillar and pivot it toward
the rear view mirror until the magnet snaps into place. While held in place by the magnet,
you can adjust the sun visor and lower the extender to provide maximum shade.
To expose the vanity mirror, lower the visorextender then lower the mirror cover. While
the cover is lowered, the mirror is exposed and
lights are illuminated.
To protect front seat occupants from sunlight
coming through the side window, lower the
sun visor from the pillar then lower the visor
extender.
Sun Visors
Opening and Closing19
Page 28 of 213

Wearing Seat BeltsUsing seat belts and child safety seats is the
most
effective way to protect occupants if a
collision occurs. Therefore, wearing a seat belt is required by law in most jurisdictions.
Both the driver and passenger seats are
equipped with three-point inertia reel seat
belts. Inertia reel belts are automatically
tensioned to allow occupants to move
comfortably during normal driving conditions.
To securely hold child safety seats, all
passenger seating positions are equipped with
an automatic locking retractor (ALR) that, by
pulling the seat belt beyond the length
needed for a typical adult occupant, locks the
belt into place until the seat belt is unbuckled
(see Installing Seat Belt Retained Child Seats
on page 34).
The seat belt reel automatically locks to prevent movement of occupants if Model X
experiences a force associated with hard acceleration, braking, cornering, or an impact
in a collision.
The seat belt reminder on the
instrument panel alerts you if a seat
belt for an occupied seat is not
fastened. If the belt remains unfastened, the reminder
flashes and
an intermittent chime sounds. If all
occupants are buckled up and the
reminder stays on, re-fasten seat
belts to ensure they are correctly
latched. Also remove any heavy
objects (such as a briefcase) from an
unoccupied seat. If the reminder
light continues to stay on, contact
Tesla.
To Fasten a Belt
1. Ensure correct positioning of the seat (see
Correct Driving Position on page 20).
2. Draw the belt out smoothly, ensuring the
belt lays
flat across the pelvis, chest and
mid-point of your collar bone, between
the neck and shoulder.
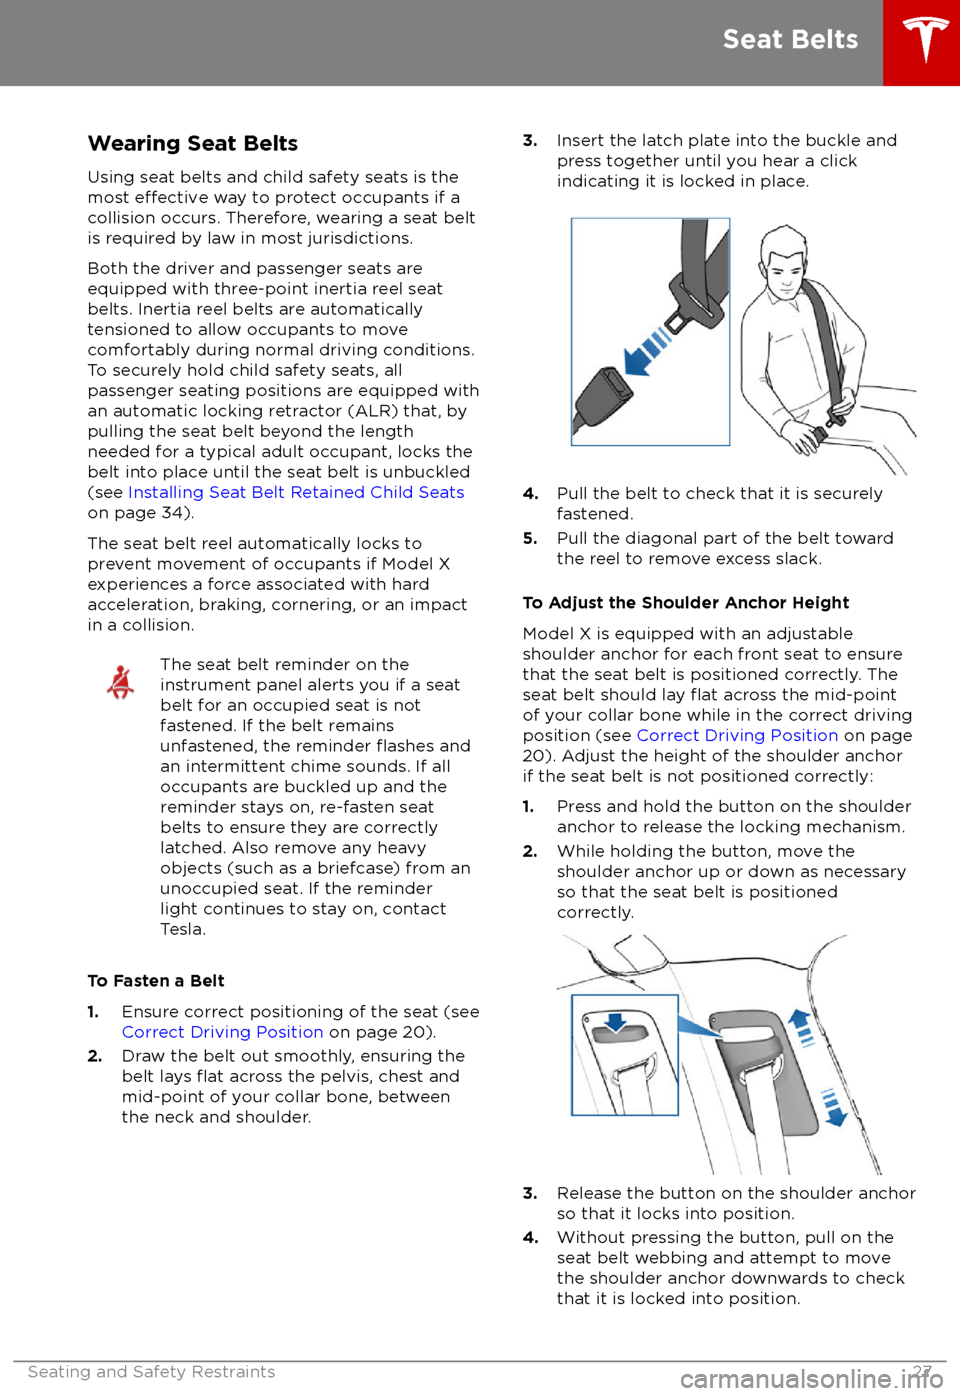
3. Insert the latch plate into the buckle and
press together until you hear a click
indicating it is locked in place.
4. Pull the belt to check that it is securely
fastened.
5. Pull the diagonal part of the belt toward
the reel to remove excess slack.
To Adjust the Shoulder Anchor Height
Model X is equipped with an adjustable
shoulder anchor for each front seat to ensure
that the seat belt is positioned correctly. The
seat belt should lay
flat across the mid-point
of your collar bone while in the correct driving
position (see Correct Driving Position on page
20). Adjust the height of the shoulder anchor
if the seat belt is not positioned correctly:
1. Press and hold the button on the shoulder
anchor to release the locking mechanism.
2. While holding the button, move the
shoulder anchor up or down as necessary
so that the seat belt is positioned correctly.
3. Release the button on the shoulder anchor
so that it locks into position.
4. Without pressing the button, pull on the
seat belt webbing and attempt to move
the shoulder anchor downwards to check that it is locked into position.
Seat Belts
Seating and Safety Restraints27
Page 54 of 213

Shifting Gears
When Model X is in Park, you must press the
brake to shift to another gear.
Move the lever up or down to change gears.
If you try to shift into a gear that the current
driving speed prohibits, a chime sounds and
the gear does not change.
Reverse
Push the lever all the way up and release. You
can only shift into Reverse when Model X is
stopped or moving less than 8 km/h. If moving
less than 1.6 km/h, you must press the brake.
Neutral
Push the lever up or down to the
first position
and release to shift into Neutral. Neutral allows
Model X to roll freely when you are not
pressing the brake pedal.
If Model X is in Park and you use the
touchscreen to release the parking brake
( Controls > E-Brake & Power
Off), Model X
shifts into Neutral (see Parking Brake on page
67).
Model X automatically shifts into Park when
you exit. To leave Model X in Neutral, use the touchscreen to engage Tow mode (see
Keeping Your Vehicle in Neutral (Tow Mode)
on page 53).
Drive
Push the lever all the way down and release.
You can shift into Drive when Model X is stopped or moving less than 8 km/h in
Reverse. If Model X is moving less than
1.6 km/h, you must press the brake to shift into Drive.
Park
Press the end of the gear selector while Model X is stopped. Whenever Model X is inPark, the parking brake is applied.
Model X automatically shifts into Park
whenever:
Page 58 of 213

IndicatorDescription
Trailer mode (if equipped) is active. See Towing and Accessories on page 80.Flashes green when the left turn signal is operating. Both turn signal indicatorsflash green when the hazard warning flashers are operating.Flashes green when the right turn signal is operating. Both turn signal indicatorsflash green when the hazard warning flashers are operating.Instrument Panel
Driving57
Page 64 of 213

High Beam HeadlightsPush the left-hand steering column lever away
from you. To cancel, pull the lever toward you.
The high beam headlights can automatically
switch to low beam when there is light
detected in front of Model X (for example,
from an oncoming vehicle). To turn this feature
on, touch Controls > Auto High Beam .
Note: Your chosen setting is retained until you
manually change it. It can also be saved in
your driver
profile.
In situations where high beams are turned offbecause AUTO HIGH BEAM is turned on and
light is detected in front of Model X, you can temporarily turn on high beams by pulling thelever all the way toward you.
The following indicator lights are visible on the
instrument panel when high beams are turned
on:
High beam headlights are on.
Illuminates when high beams are on but the Auto High Beam setting is
turned
off or if the Auto High Beam
setting is turned on but is
termporarily unavaible.
High beams are currently turned on,
and Auto High Beam is ready to turn
off the high beams if light is
detected in front of Model X.
High beams are temporarily turnedoff because Auto High Beam is on
and is detecting light in front of
Model X. When light is no longer
detected, the high beams will
automatically turn back on.
To flash the headlight high beams, pull the
lever fully toward you and release.
Warning: Auto High Beam is an aid only
and is subject to limitations. It is the
driver
Page 81 of 213

The towing package allows you to tow a trailer
with your Model X. It also allows you to carry skis, snowboards, bicycles, etc. by attaching
an accessory carrier to the hitch.
Carrying Accessories
The Model X towing package has a 50 mm ball
coupling that can support an accessory
carrier.
The ball coupling is designed to support vertical loads of up to 54 kg. When carryingbicycles or other items on the Model X hitch,always check to ensure that the maximum
weight is not exceeded. When calculatingweight, remember to include the weight of the
accessory carrier. For example, assuming the
carrier weighs 14 kg, the weight threshold is
sufficient for carrying two bicycles weighing
approximately 20 kg each, or four bicycles
weighing approximately 10 kg each.
Caution: The Model X hitch is designed to
support up to 54 kg. Exceeding this
maximum weight can cause
significantdamage.
Caution: Do not attempt to install a
carrier on a Model X that is not equipped
with the towing package. Doing so can
cause
significant damage.
To install and use an accessory carrier, the tow
hitch must be connected (see Connecting the
Tow Hitch on page 85). Then follow the
instructions provided with your accessory
carrier. Observe all regulations and legal requirements in your state/region that apply
to carrying accessories.
The Model X towing package includes the wiring necessary for using an accessory carrier
equipped with lights (see Electrical
Connections on page 87). The package also
includes Trailer Mode software (see Trailer
Mode on page 83).
When you connect an accessory
carrier